 |
| Brownies Delight |
Baking and cooking has become my passion since I discovered my love for food. Although I haven’t undergone any formal culinary arts training but somehow I was able to make several desserts and snacks. In fact, I posted in my facebook album the many recipes I have tried from the internet.
One of my favorite is the BROWNIES – which happens to be my son’s favorite too. For us, baking brownies is a great mother-and-son bonding moment that we use to do during weekends. Making your own homemade brownies is a very worthwhile thing to try. It’s inexpensive, tasty, healthy, and teaches you a lot about how to cook at home. Best of all (for me, anyway) it makes mindblowing do-it-yourself goodies -a perfect gift for your love ones or an ideal threat for snack and parties. I love to indulge my day with a slice of brownie and a glass of cold ice tea.
Equipment and Ingredients
Basically, you have to prepare the equipment and ingredients necessary to bake your own Brownies Delight. Refer to the picture below.

The equipment you need includes:
1. One large mixing bowl, preferably made of stainless steel and a second one is also useful, but optional – you can get by with one if you’re willing to wash it in the middle of the process.
2. Measuring cups – a 1 cup, ½ cup, and ¼ cup will do the job.
3. Measuring spoon – a one-teaspoon measurer will be just enough.
4. Mixing spoon or Laddle– necessary to mix the liquid and dry ingredients together.
5. Measuring scale – this is optional if you prefer to follow the measurement in cups.
6. Sifter – useful for flour and other dry ingredients.
7. Baking dish – (9 x 13 inches) - you can use either made of glass or aluminum.
8. Butter brush – ideal for greasing the baking glass.
9. Electric Mixer – necessary but optional - to mix the ingredients properly.
10. Spatula – this is not found in the picture since it is optional but best to use to scrape the remaining mixture from the mixing bowl.
Now for the ingredients, you need:
100g or ½ cup of chocolate bar
220 g or 2 ¼ cup of butter
450 g or 2 ½ cup of sugar
4 eggs beaten
1 tsp baking powder
½ tsp salt
1 ½ cup flour
1 tsp vanilla
1 cup almond nuts (ideally in flakes)
That’s all you need for a homemade brownies delight, and it’s all stuff that is pretty common in most kitchens. There are some neat things you can do with added ingredients, which I will share to you later, but right now you need is that basic stuff. There is nothing complicated, or “secret”, or confusing at all.
Ingredients Preparation
Now that we have the tools and ingredients, let’s get started.
First, you have to get the ingredients ready with the right measurement before mixing them together. Preparing the ingredients beforehand is absolutely necessary to give you ease and convenience when you do the actual mixture preparation afterwards.
Now, cut the butter into the desired amount. For me, I use a measuring scale to make sure that I get the right quantity of butter. This is necessary to give your brownies a chewy and delightful taste.

Then, beat the four eggs in a bowl using an electric mixer or a manual egg beater. The eggs should be well beaten to come up with a smooth mixture. Then set aside.

Place in a sifter the dry ingredients such as flour, salt, baking powder together. A sifter is more ideal to use not only does sifting break up any clumps in the powder (especially if the sifter is equipped with a wire mixer), it introduces more air into the mixture between the particles. This makes for lighter and fluffier baked goods. Shake the sifter or you may use a spoon. If you see bigger clumps of flour, simply press the spoon against the flat suface of the sifter to completely break them up.

Mixture Preparation
Now that the ingredients are ready and set, you can proceed to the brownies’ mixture preparation.
Melt the butter and the chocolate in a mixing bowl under a low heat. Keep stirring to prevent it from burning. After sometime you would notice a smooth sticky chocolate mixture. It would mean that everything looks perfect as the chocolate is accurately melted.

Remove the chocolate mixture from the heat and slowly place one cup of sugar. Start stirring and try to taste if you prefer the level of sweetness. You may add one and half cup more if you intend to do so. If you want darker colored brownies you can use brown sugar and dark chocolate instead. Place the mixture over the low heat again. Sugar greatly enhances the taste and texture of brownies, so you have to combine it well with the chocolate mixture. Remember, kids usually like brownies that are sweetier and tastier!

Take the chocolate mixture aside and let it cool for a while. After sometime, slowly add the beaten eggs and mix together using an electric mixer. Keep mixing until the eggs is well blended and turn into a thick rich chocolate fusion.

Place one teaspoon of vanilla to enhance the aroma of the mixture. And beat again.

When all the liquid ingredients are mixed up completely, it is time to combine the dry ingredients.
Gently place the first half of the flour mixture into the chocolate mixture. Using a wooden spoon, stir them together in a single direction either clockwise or counterclockwise. Continue stirring while adding the second half of the flour mixture.

To add some nutty flavor and texture to the brownies, place the almond flakes. If there are no flakes available, you may use whole almond nuts and just grind them. Almond is essential not just on adding quality to our food but it also has enormous benefits to our health too. One thing, it can be of an advantage by giving your skin smooth and lustrous appearance.

Actual Baking Process
Now comes the final part – the baking process. Preheat the oven to 350 degrees Farenheit. While heating up the oven, grease the glass baking dish with butter using a brush. This manner will prevent the brownies from sticking to the dish.


Put the brownies mixture in the oven for 30 -35 minutes or until center feels springy. Be careful not to overcook. When it is done, pull it out and let it cool down. It’ll look something like this, hopefully.
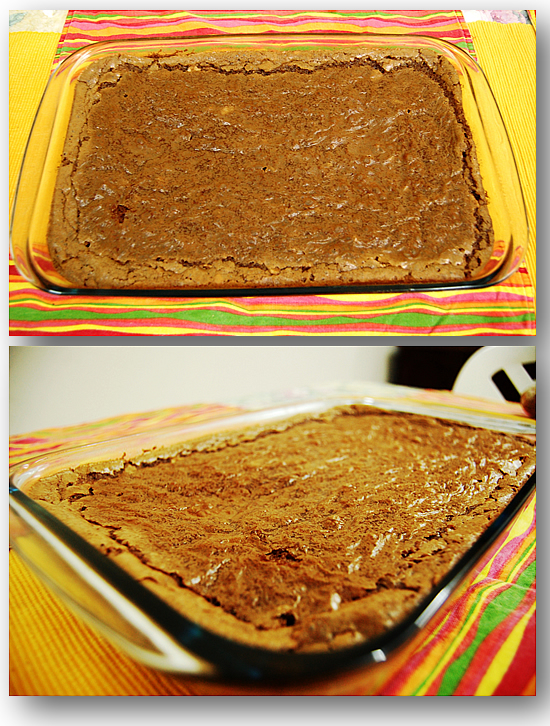
Once completely cooled down, divide the brownies into pieces and place it on muffin cups for a nice presentation.

This brownie will make mind-blowing dessert. Seriously, just place it in the refrigerator and cool for one hour. Place a peanut butter on top and match with your favorite drinks. Truly, truly sublime.
On beyond the basic brownies
If you get into making your own brownies, you’ll eventually start experimenting. Here are some tips I’ve learned so far.
Decorate your brownies. You may add more appearance to your brownies to make it a perfect gift to your love ones or simply as part of your party threat. Place sugar strands on tops or chocolate chips. Place it in a box and decorate with some ribbons then on you have a nice Do-It-Yourself masterpiece.
Sugar over chocolate – if you want to place chocolate chips as toppings you may lessen the sugar mixture as it can accelerate the sweetness. But it still depends on you and your guest’s preferences -either the oldies or the younger ones.
Other nuts – sometimes almonds are a little expensive. So you may replace it with peanuts. Or if you want to add more variety of nuts you can also mix cashew nuts, hazel nuts, walnuts, or even raisins.
Dark chocolate and brown sugar – Simply use dark chocolate and brown sugar to give your brownies a rich dark brown color and more tempting aroma.
wow sa pix pa lami na unsa pa kaha pag matilawan ang brownies! mo anha us para maka tilaw ko s brownies nimo!
ReplyDeletethanks sa comment! i normally gave this to my friends and officemates. They really love the taste and chewy texture that gives you more temptations..hehehe ;-)
ReplyDeleteyummy I love this...
ReplyDeletei'll try this at home yang! hehe
ReplyDelete@Tygue: sure tyg..it is easy to prepare and cheaper..i have more recipes to post later on.. which i have done several times with my son Andrei.
ReplyDelete